


Le Tonkinois Varnish
B & D Murkin
UK main importers for
Le Tonkinois varnish
Flexidisc sander
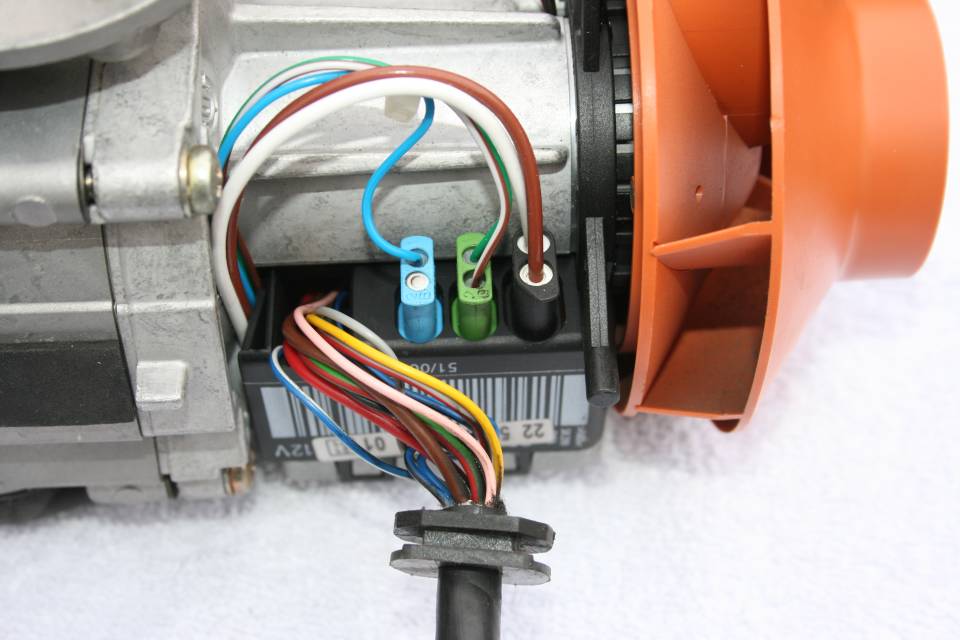
The three plugs connecting the overheat sensor, flame sensor & glow pin to the Airtronic ECU. They can be accessed by removing the D2 top cover and then releasing the ECU fixings.

Airtronic Combined sensor wiring.

The Airtronic D2/D4 glow pin is ceramic and smaller than older versions.
These timings from our own heaters may help while confirming 'two start attempt failure' symptoms.


Airtronic Combined Flame and Overheat sensor.


If pump connector is fitted without depressing spring it is prevented from pushing fully home and does not make a connection, a fairly common fault during tests. This connector is ok.
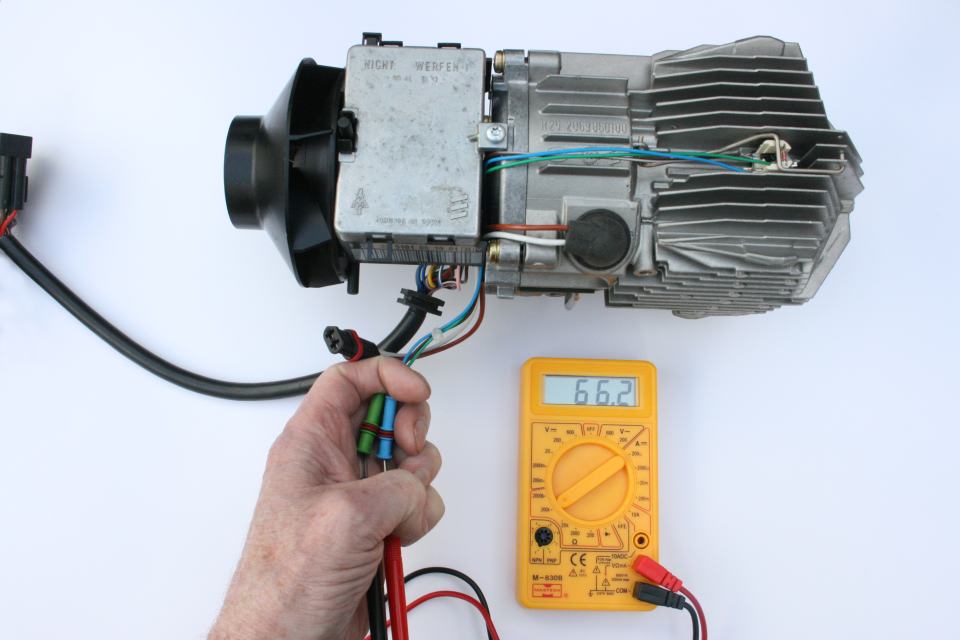
Multimeter leads connected together.
Meter is set to lowest range, 200 ohms Resistance value of leads 0.6 ohms.
Test of glow pin giving a reading of 1.1 ohms. The meter reading has increased by 0.5 ohms which is the resistance of the glow pin.
Flame sensor Fault codes 064, 065, also 013, 014, 051.
Disconnect the green connector from the Airtronic ECU and measure the flame sensor resistance across the green and brown/white wires. It should be approximately 1000 ohms at room temperature. (1000 is also referred to as 1k or 1k0). At 20 deg C quoted value is between 1056 and 1100, at 0 deg C between 980 and 1020 ohms.* Check the green connector is not corroded and is fully pushed home.
Overheat temperature sensor Fault codes 071, 072, also 012, 014, 017.
Disconnect the green and blue connectors from the Airtronic ECU and measure the sensor resistance across the blue and brown/white wires. It should be approximately 60,000 ohms at room temperature. ( 60,000 is also referred to as 60k). At 20 deg C quoted value is between 59.3k and 65.8k, at 0 deg C between 155k and 175k ohms.* Check both connectors are not corroded and are fully pushed home.
*In practice the Eberspacher does not know the actual temperature and start up check limits will be very wide.
Airtronic Flame sensor test.
Meter set on 20k ohms range.
Airtronic Overheat sensor test.
Meter is set on 200k ohms range.
Fuel metering pump Fault codes 047, 048, 049
Check the wiring connections are tight and free from corrosion on the pump terminals and at the end of the wiring loom. Check the Airtronic type fuel pump connector has correctly locked into position. Check the wiring between these two points for damage. Disconnect the pump either at the pump terminals or at the end of the loom and measure the resistance of the pump which should be between 9.0 and 10.0 ohms for 12v, between 34.2 and 37.8 ohm 24v. In practice the check limits are set wide, a 24v pump on a 12v Eberspacher, ie about 3 times the resistance, passed Eberspacher electrical fault checks, only failing on pumping fuel. Alternatively test the pump, details how to do this are on the fuel page.
Many users assume the pump is faulty because it is not pumping, note that it will only pump once all pre-
Some ECU faults can apply continuous power to the pump causing it to get hot during these checks.
Airtronic type fuel pump connector.
Left Metal spring in locked position.
Right Insert & release position.
Operator control unit set value potentiometer, sometimes called the rheostat or set temperature control. Fault codes 62, 63.
Check grey/red and brown/white wires to the control for a break or short circuit.
The control can be substituted by a simple DIY controller for testing, details on the controller page. Connect the potentiometer to the grey/red and brown/white wires in place of the control. Then start the heater, either with the control switch or by joining the red and yellow wires.
If your controller is a Rheostat disconnect the grey/red wire from the terminal on the controller. Measure resistance from the terminal to the brown/white wire, the control should adjust from 1750 to 2180 ± 80 ohms. This rheostat resistance test will not work for modern controllers.
An alternative test is to measure the voltage between the grey/red and brown/white wires. The value is not published but with an 801 controller it measured between 2.27 and 2.54 volts, see controllers page.
(Unexpectedly a D2 with code 62 did not fail the pre start checks, it is not known at what point this is detected or if this applies to other heater models.)
Blower motor Fault codes 031, 032, 033, 034
As the fan is pulsed during pre start tests it is likely the motor is checked. If the other components are ok and the fan does not pulse once or turn slowly check it is free to rotate. The fan blades can catch on the case or on the ECU. The glowpin wiring on Airtronic heaters can cause the ECU to be pushed forward and catch on the impeller.
Check the blower connector is fully inserted and free from corrosion.
Check the resistance of the motor is roughly 0.5 ohms and the magnet is in the impeller.
Repair of blower motors including missing magnet is covered on our Blowers page.
Fault lock out
Starting failures are more likely to be caused by the above faults so eliminate these causes first.
The ECU can be locked after a serious fault condition, usually bad overheating. Fault codes 015, 017, 050, 099. It is locked for a good safety reason to protect both you and the heater.
DO NOT RESET until the cause has been cleared.
Depending upon the overheat severity other components may be damaged.
Personally I would dismantle the heater to check items like the fan impeller for damage.
While it is apart it would be sensible to do a full service as the same time.
The lock out is reset by clearing the fault codes with diagnostic equipment such as the 801, 701(blue logo) and EasyStart controllers. More details of lockouts are at bottom of page 2.
Stage 3 Preheat failure
Heater switches off at any time before completing the normal start sequence.
Flat battery or a bad electrical connection.
Heater switches off after about 10 seconds Fault code 33.
The fan is checked when it is rotating about 10 seconds after switch on.
A magnet mounted in the impeller is detected by a sensor inside the ECU as the fan rotates.
Check the ECU is correctly mounted and the magnet, shown above, is in place.
Some heater models use a different method for checking motor speed so have no magnet.
Heater switches off before completing start sequence, typically after 20 to 45 seconds. Fault code 11.
While the glow pin is energised the Eberspacher takes maximum battery current, (8 Amps for D2 & D4, 20 Amps for older models.) If the voltage at the heater terminals drops too low for 20 seconds the heater is switched off, usually switching off between the 20 and 45 second point. The voltage at the heater can be a lot lower than the battery terminal voltage due to losses in the wiring. This is a very common cause of failure and is covered in detail in the Low Voltage page.
Heater switches off before completing start sequence.
The speed of the blower motor is monitored continuously. If the fan motor does not start up or its speed deviates by more than 10% the heater is switched off after 30 seconds.
Heater goes through normal start sequence but pump does not pulse, usually when first used after summer.
Pump may have seized mechanically, solutions on our fuel page.
Stage 4 Start failure
A) Heater makes two attempts to start, emits smoke for a while or it may smoke heavily and then it stops. Fault code 52.
White smoke is heated fuel and air mixture that has not been burnt so the heater is failing to ignite the fuel. Usually cause is a clogged glowpin screen or build up of carbon inside the heater.
Give heater a service, DIY servicing details are on servicing pages.
See also Heater starts with difficulty section below for more causes and photos of the excessive smoking.
B) Heater makes two attempts to start with no success and then stops completely, no smoke comes from the exhaust pipe.
No smoke usually means no fuel is reaching the Eberspacher. Check if you have run out of or are simply low on fuel, a tank pick up tube can be 50 mm or more above the tank bottom. This ensures there will be enough fuel left to run the engine and prevents water and crud in the bottom of the tank from being picked up. As an example on one camper van the tank held diesel for about 250 miles but the heater stopped working after 200 miles.
If the fuel pipes were empty before starting check if purging of air is complete.
Check fuel is arriving at the heater, disconnect fuel pipe, fuel should squirt out on each pump stroke. If there is no fuel look at the Fuel page.
Do the fuel quantity check, if the amount of fuel is insufficient -
Check for water in tank, water from condensation builds up in bottom of tank and it can be pumped instead of fuel.
Check if exhaust pipe / silencer or combustion air intake pipes are blocked, possibly with ice or water.
If a service is not done check the glow pin, clean ventilation hole above the screen in the glow pin chamber. If the glowpin screen is removed check the fuel inlet hole is clear. It may also be worth blowing through the metal fuel pipe section from where the fuel pipe is connected to the glowpin chamber before fitting the new screen.
Check fuel for degradation and floating debris, see fuel page.
Check also the Eberspacher starts normally but stops whilst running, it may try to restart and Heater starts with difficulty sections as causes can be the same.
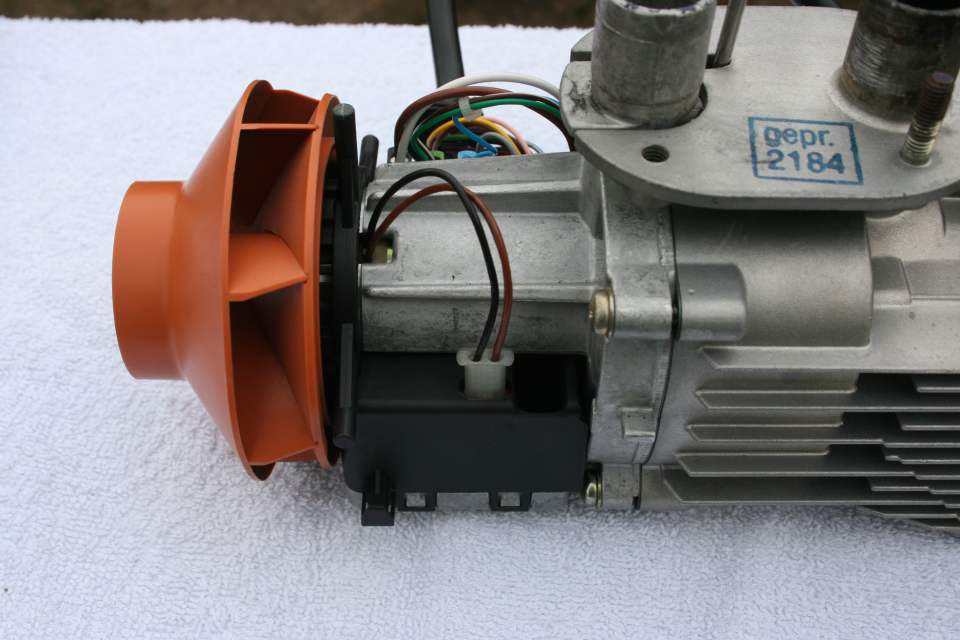
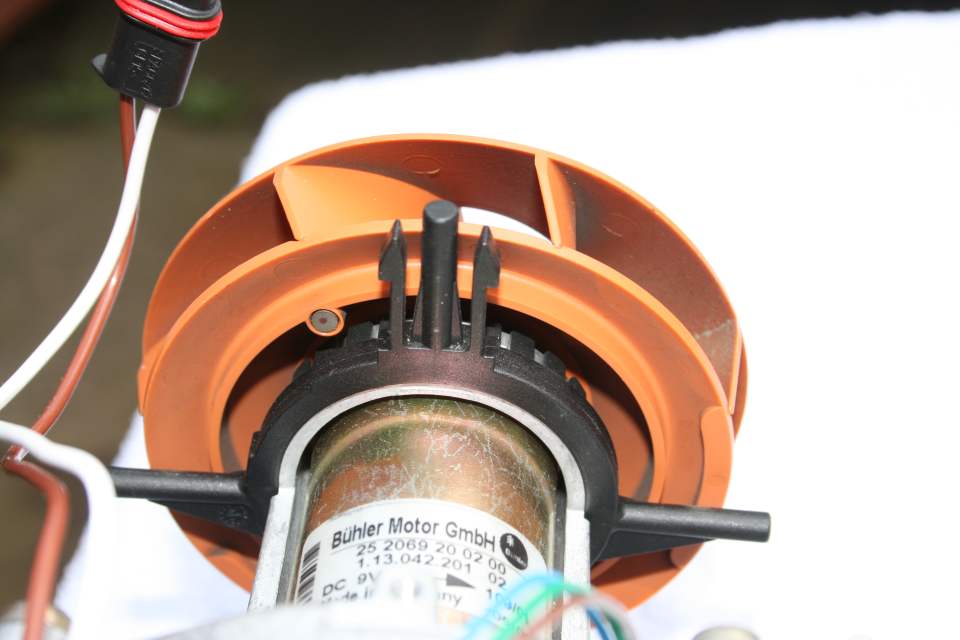
Airtronic ECU Blower connector.
ECU mounting clips and impeller magnet.
|
Heater Model |
Switch on mm.ss |
Pump start attempt 1 mm.ss |
Pump stop attempt 1 mm.ss |
Pump start attempt 2 mm.ss |
Pump stop attempt 2 mm.ss |
Fan stopped mm.ss |
|
Airtronic D2 |
00:00 |
01:10 |
02:35 |
04:45 |
06:15 |
10:15 |
|
Airtronic D4 |
00:00 |
01:10 |
03:00 |
03:20 |
04:30 |
08:30 |
|
D1LCC |
00:00 |
00:30 |
02:00 |
02:30 |
03:55 |
07:55 |
Heater makes two attempts to start, then stops. During both attempts it sounds as if the heater started before it stopped. Usually there is only a short burst of smoke as when the heater starts normally.
The heater ignited but the flame was not detected. Check the flame sensor.
Heater starts with difficulty, often on the second attempt with a lot of smoke.
Fuel has degraded or contains water, more info Fuel pages.
Check the fuel filter, do a fuel volume test.
The Eberspacher requires servicing, this was why we serviced the D2 shown in detail on our Service page.
Eberspacher recommend servicing each year, more often for some fuels, or every 2 years for low usage heaters.
Dereks tip -
This can burn off some of the deposits increasing time before a service is needed.
Check exhaust pipe and exhaust silencer for blockages.
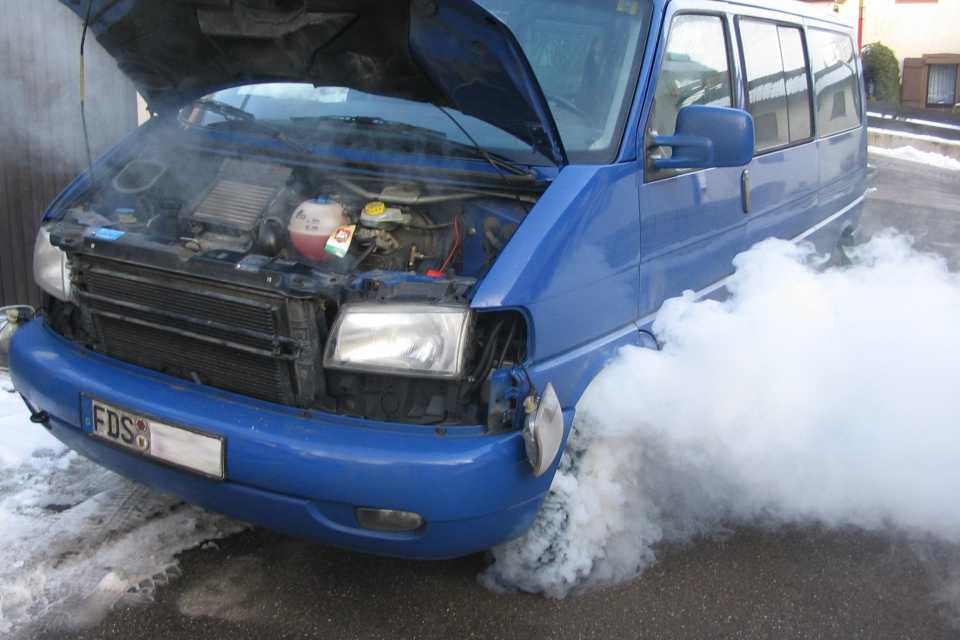
Eberspacher heater smokes excessively during starting.
Spectacular Eberspacher smoke while clearing a large amount of unburnt fuel.
www.juergen-
It's not only Eberspachers,
Video of a smoking Webasto.
www.youtube.com/watch?v=311Qzcz_wy0
A modern Eberspacher heater in good condition may produce a slight amount of smoke for a couple of seconds whilst starting. If carbon is allowed to build up, the fuel takes longer to ignite so startup smoking intensity and duration increases, our spare Airtronic D2 which had not been serviced since we bought it smoked for about 4 seconds. Some unburnt fuel smell is normal during startup. Usually once the heater temperature rises there will be no visible smoke. Condensation from the hot gasses will be more visible in cold weather so make allowances for it.
White smoke for more than a few seconds at startup is a symptom of incomplete combustion or a weak air-
Check for fuel problems, do a fuel quantity test. Check motor speed. Check for blocked air inlet and exhaust pipes / silencer.
White smoke / steam as the exhaust heats up may also be from water / condensation in the exhaust.
Note combustion gasses always contain a considerable amount of water vapour.
Reroute exhaust so it runs downhill or fit a drain fitting. They are listed in the Eberspacher Marine installation manuals. Reposition exhaust outlet or fit higher above the water line.
Black smoke means a rich fuel air mixture, wasted fuel and more carbon build up. A rich mixture can also cause overheating shutdowns. Service heater. Check for blocked air inlet / exhaust pipes / silencer. Check for fuel problems, do a fuel quantity test. Check motor speed.
Burners will eventually wear out but the symptoms are unlikely to occur quickly, they probably develop over several months. The mesh inside the burner acts as a wick to hold fuel and maintain the burn. When this deteriorates it can cause black smoke and the heater to flame out as it ramps up.
Some very old heaters have simple controllers which do not delay pumping the fuel until the glowpin has heated up so these can smoke quite badly during startup unless everything is really clean.
When Eberspacher heaters fail the white smoke can be alarming and it may look like the heater has blown up and needs a very expensive repair. In reality it is usually easy to fix as the smoke is unburnt fuel, and a service fixes the problem.
One point that can easily catch users out is after repair the Eberspacher may still emit clouds of smoke even though it has started ok. We did an unnecessary stripdown on one of our D2 heaters when this happened. When the heater fails to start fuel is pumped until the heater aborts the start attempt, it then retries a second start. The user then turns the heater off and tries again, usually for several times in the vain hope it will start. The unburnt fuel builds up and has to go somewhere, some will be vented out the exhaust as smoke, the rest pools in the burner, exhaust pipe and silencer.
After repair the heater fires up ok, the exhaust gasses are not hot enough to ignite the unburnt fuel but do vaporise it and it comes out the exhaust as smoke. Sometimes this can be even more spectacular than the original fault, photo above! Once all the unburnt fuel has cleared the smoke should stop.
In very rare cases, probably only with petrol heaters as I have only seen it mentioned in a forum reply, the fuel in the exhaust pipe can vaporise and ignite with a bang, sometimes destroying the pipe.
When ambient temperatures are low heater starts with difficulty or fails to start.
Fuel is unsuitable type or has degraded, more info fuel pages.
Battery in bad condition or discharged, solutions on low voltage page.
Eberspacher needs to have engine running or be on shore power to start reliably.
Classic symptoms of low voltage problems, solutions on low voltage page.
Weird faults
Occasionally you will have a situation where the fault symptoms don’t seem to make any sense.
There might be a combination of what look like unrelated faults or the heater performs strangely.
This is often caused by poor connections on the brown/white or brown earth wires or using the brown instead of the brown/white.
Another reason is poor connections on the battery supply, particularly on the negative.
Sometimes the negative uses the chassis as part of the circuit and the connections to it may not be good.
Eberspachers model naming system has obviously not been done by engineers and is very confusing, not helped by their latest models. Ensure you identify the model from the label on the heater before beginning.
A less likely reason is a faulty temperature control on/off switch or the wiring to it. Once you have confirmed power into the Eberspacher is ok check for 12v on the red wire on the temperature controller. If it is absent and the loom contains two fuses check the 5A fuse, otherwise the wiring may be faulty.
With the heater switched on check for 12v on the yellow wire. If it is not ok jump a short circuit across the red and yellow wires or join the two together, the controller can still be connected.
If the Eberspacher starts operating the fault is the switch. Disconnect the yellow wire from the switch and then vigorously switch on and off a number of times, this can often clean the switch contacts.
When the heater is switched on the controller light or display is on, nothing happens or there might be a click from the relay.
This condition is very similar to the pre start failure condition shown below so also check that section.
Check for a discharged battery, there can be enough power for the light but not for everything else to work.
If the loom is the version containing two fuses check the 20 amp fuse.
With the controller switched on check for +12v on the yellow wire, or on Pin 4 on the back of the D2/D4 connector. If absent jump a short circuit across the red and yellow wires or join the two together, the controller can still be connected. If the heater starts the fault is the controller.
Disconnect the Eberspacher D2/D4 connector, check for corrosion on the terminals.
Some older models do not automatically reset after overheating, they have a reset switch on the top of the heater under a rubber bung.
The heater might be locked out after overheating, fault codes 15, 17, 50. Some D1LCC heaters versions can lock out after 5 identical faults. We have not encountered this. Providing no other components are damaged the locked ECU can be reset with equipment like the diagnostic unit, 7 day timer, 701, 801 or EasyStart Select controllers. We have no information on suitability of EasyStart Pro controllers.
ECU failure.
When turned on, the heater just blows cold air, never stops and does not perform a start attempt.
Check if the Ventilation button was pressed instead of Heat by mistake.
Check controller, a fault could result in it switching to ventilation mode instead of heating mode.
The Operator control unit set value potentiometer section below gives details on diagnosing the controller
Check the flame and overheat sensors as described below, a sensor can falsely indicate the burner is hot and requires cooling. A bad or loose connection of the sensor plug could cause this.
Check target temperature grey/red wire for a short circuit to earth or to brown/white or brown wires.
Make a visual inspection for bare wires and anything touching.
Disconnect heater and controller, then test grey/red wire for short circuits.
Use the multi-
The meter should give an out of range indication ( 1 . ) for no short, 00.0 for a fault.
Check ECU. Unfortunately this seems to be one major ECU failure symptom for Eberspacher Airtronic heaters.
When turned on, the blower motor quickly builds to maximum speed then stops.
One Airtronic D2 had this fault, diagnostic fault codes were not working, ECU was faulty.
Fuse blows when connected or when switched on.
If the battery has been removed check it has not been re-
Unplug the Airtronic heater connector and replace the fuse, if it blows again there is a wiring fault.
One common reason is a loose strand of wire from multi-
If the fuse is ok the loom power wiring is ok. Remove the fuse before reconnecting to prevent sparking causing damage to the contacts, then replace the fuse.
The ECU checks the Glowpin, Blower, Pump(s), Controller, Flame sensor and Overheat sensor during pre startup checks. It aborts if any of these are short circuit so in theory these should not be the cause of blown fuses. If the 20 amp fuse is blowing on Airtronics heaters unplug the four 2 pin connectors from the ECU as a double check and try again. If the 5 amp fuse is blowing on Airtronic heaters check the controller and its wiring. If the fuse still blows the ECU is faulty.
On other heater models it is more difficult to isolate parts, unplug the ECU and check everything else for short circuits.
16 amp bullet fuses were fitted to older models. These must be ceramic slow blow types, standard 16 amp bullet fuses will blow. Personally we usually recommend replacing them with blade type fuses. Blade fuses have to be upgraded to 30 amps, see FAQ page for details.
Stage 2 Pre start check failure
The heater turns blower a few times, pump and ECU’s relay may click one time but heater will not make an attempt to start.
Check for bad power connections or a discharged battery.
A fault in some components in the list below prevents the startup continuing. Eberspacher do not give many details of their initial checks some may not be checked till later. The test limits during startup are set quite wide so when checking you need only check for components that measure very different from normal. Ensure the item is disconnected from the Electronic Control Unit (ECU) before making any measurements. Measure the electrical resistance of each item for short circuit or open circuit components, faulty wiring, check for unplugged connectors.
Glow pin. Fault codes 20, 21, or 22.
Disconnect the Airtronic black connector with the brown and white wires from the ECU and check the glow pin resistance. A glowpin should measure between 0.42 to 0.7 ohms for a 12 volt heater, (1.2 -
Airtronic D2 and D4 glow pin failures are rare, older type glow pins burning out and failing open circuit are a fairly common fault. Eberspacher say do not connect D2 D4 glowpins to a 12v battery to test as they may burn out. In practice users say they have done so without problems, on normal voltage they glow red hot, on 12v a lot hotter. Keep the test short and remember health and safety, keep it away from anything flammable. Knobbly deposits on the glow pin usually indicate water in the fuel.
Many if not most Eberspacher faults can be identified and repaired by a reasonable DIYer. Our pages are mainly aimed at owners who do not have a diagnostic tool to help them identify the fault. Although the pages are for D2, D4 and D1LC Compact heaters, most sections apply to other models.
Note quoted fault codes do not apply to D2L and D4L heaters as Eberspacher has changed their codes.
Faults are listed in a logical order, look down the list for the heading that matches your fault and begin there. Fault causes before that point can usually be ignored saving a lot of wasted repair time.
If you have an Eberspacher controller with diagnostic readout use it, you can save many hours of investigation time. It may be worth considering changing your controller to one with diagnostics like an 801, 701 (blue logo version), or EasyStart Select (check compatibility), details of these are on the Controllers page.
We have an improved / corrected version of the diagnostic fault codes from the manuals on our Fault codes page. DO NOT RESET the fault codes without permanently recording them, this information can be valuable for anyone diagnosing problems. Some serious faults lock out the heater for safety reasons, clear these faults before resetting. Occasionally the diagnostics can mislead by pointing to components outside the ECU when the fault is actually within the ECU. Also some parts of the ECU must be working to be able to send the diagnostic information to the controller. Most users still have controllers without diagnostics and these pages are primarily aimed at repairing many faults without them.
Levels of DIY ability vary and it is not expected that everyone will want to or be able to do all these tests.
In that case a visit to a dealer or service agent may be needed after eliminating some causes.
Some faults, particularly ECU and burner failures, may have to be identified by dealers or by substituting known good components, there is no way we can identify or solve every problem for you here.
This page is based on repairs to Eberspacher Airtronic heaters, D2 D4 D5, but most of the general information also applies to other models including Eberspacher water heaters. We are adding water heater pages to the site and this page will be updated in the future to incorporate specific water heater faults.
This is not an installation site so most installation errors are not covered. It is intended for maintenance and repair of Eberspacher heaters that have been properly installed and have previously been working ok.
During the start up phase several faults are detected by the ECU, the heater shuts down before switching on the glowpin and pumping fuel. The timing details are for the Eberspacher D2, other models can differ but most fault details will still apply. A multimeter will be required to test components and sensors. They are cheap, on Ebay March 2014 new ones similar to the one shown were £2.70 post free. I have included pictures showing tests and the position of the range selection switch. Do not force the probes into the connectors, just hold them against the metal contacts. All 12v references should be replaced by 24v for 24v heaters. Low voltage, Wiring and Fuel problems are covered in greater detail on separate pages.
Most faults are now adequately covered but that also means the number of possible fault causes listed here may be daunting. The vast majority of heaters run without any problems, just needing a regular service. We have never personally encountered most of the faults listed here.
The design lifetime of an Eberspacher air heater is 4000 hours at maximum heat setting. This figure increases with lower heat use so most users heaters will last a lot longer. Hydronic heaters have 6000 hours.
How an Eberspacher Airtronic D2 should start up when working if there are no faults
This is what you would expect with a fully working Airtronic D2, not the Airtronic D2L.
D4 and D1LCC sequences are slightly different and are listed at bottom of the second page.
Stage 1 Switch on.
When the D2 heater is switched on, the indicator light in the controller illuminates showing the heater is on.
There may be a small click in the heater as the relay switches.
Stage 2 Pre start checks.
Control unit does an electrical check of the glow pin, flame sensor, temperature sensor, fuel metering pump, control unit and possibly the fan. The fan may pulse once or turn slowly. The start will be aborted if any of these fail. The checks are completed in about 3 seconds.
Stage 3 Preheat.
Glow pin is energized and starts preheating the combustion chamber.
Blower turns slowly for about 40 seconds, then increases speed slightly.
Stage 4 Fuel on.
At 60 second point pump starts, increasing pump speed for 5 seconds then drops immediately to medium pumping rate, at same time fan speed increases gradually up to medium. White smoke which is the result of incomplete combustion of the diesel fuel may come from exhaust. The fuel air mixture flows around the glowpin and the hot glowpin screen. Once the fuel ignites white smoke stops and you hear a jet like noise which increases. When the flame detector detects the flame, in the manual this is shown occurring at the 80 seconds point which is possibly fairly typical, the glow pin will then remain on for a further 60 seconds (140 seconds point in the example).
If the heater does not ignite within 90 seconds after starting the fuel pump another start attempt is made. If the heater still does not ignite after another 90 seconds of pumping fuel, the heater is switched off i.e. the fuel supply is off and the fan runs on for about 4 minutes.
At 100 second point fan speed and pump rate increase.
At 260 second point the heater is at maximum fan speed, pump speed, fuel quantity and roaring noise.
Once the heat exchanger reaches optimum temperature the Eberspacher switches into control mode, the pump rate and fan speed are controlled by the ECU to give the required heat output -
When the heater is switched off the fuel pump stops and the glow pin is switched on for 40 seconds to clean off any combustion residues. The fan speed gradually reduces, it continues to run for 4 minutes to cool the heater. If the heater is restarted and heat exchanger is too hot the fan will cool it before restarting.

The most common Eberspacher faults
The faults in this section are probably responsible for more than 8 out of 10 Eberspacher faults and do not require much expertise to solve or repair so may be a good starting point before progressing to the complete diagnosis section.
Disclaimer
You use any information and advice we give entirely at your own risk.
If you do not accept this do not use this site, go to an Eberspacher dealer.
We have tried to make it as accurate as we can but accept no liability for errors or problems caused by following our pages. Some of the information is only suitable for people with a good aptitude for mechanical and electrical repairs. Any DIY involves some risk of accidents and you must decide if you are capable and can do it safely before carrying out any work.
You should also ensure your DIY is done to a professional standard in order to avoid creating potential hazards and insurance invalidation. Boat installations must strictly comply with Marine regulations.
Electrical.
No power -
Low Voltage -
Usual symptom -
It is important to realise that it is the voltage at the heater that matters, not at the battery terminals.
Note that leisure batteries often deteriorate badly without users knowing.
Our Low Voltage page deals with solving these low voltage problems in detail.
Many intermittent problems are caused by corroded or loose connections or switch contacts.
They are one of the major fault causes for older heaters.
Fuel supply
Various symptoms -
As a first step check you have sufficient fuel. The end of the fuel pickup tube is usually between 1 and 4 inches above the tank bottom to ensure there will still be fuel left to run the engine. This can cause users to think the heater is faulty as there is still fuel in the tank and the engine starts ok.
Fuel page deals with checking the pump, fuel filter and many other fuel supply faults.
Eberspacher in need of a mechanical service.
Usual symptom -
Eberspacher heaters should be serviced every 2000 hours or every 2 years for low usage heaters.
D1L D3L D5L heaters are probably better off being left alone until problems arise.
Service may need to be done more often for some fuel types. Service page shows DIY servicing details.
Heating and combustion air and exhaust pipes and silencer obstructed or partially blocked.
Usual symptom -
Check air inlet and output ports and pipes for obstruction or crushing.
Check combustion air inlet and exhaust pipes and silencer for obstructions.
Old models do not automatically reset after overheating, they have a reset switch on the top of the heater under a rubber bung.
If these are not the cause proceed to the next section.
Eberspacher fault diagnosis and repair Part 1
Finding the cause of the fault
Faults are in a logical order, look down the list and start at the bold heading that matches your fault.
You can usually ignore the fault causes before that point.
Stage 1 Switch on
When the Eberspacher D2 or D4 heater is switched on it is completely dead, nothing happens.
If the controller light or the display for some controller types is on go to the next heading.
The most likely problem is no power. Check for blown fuses-
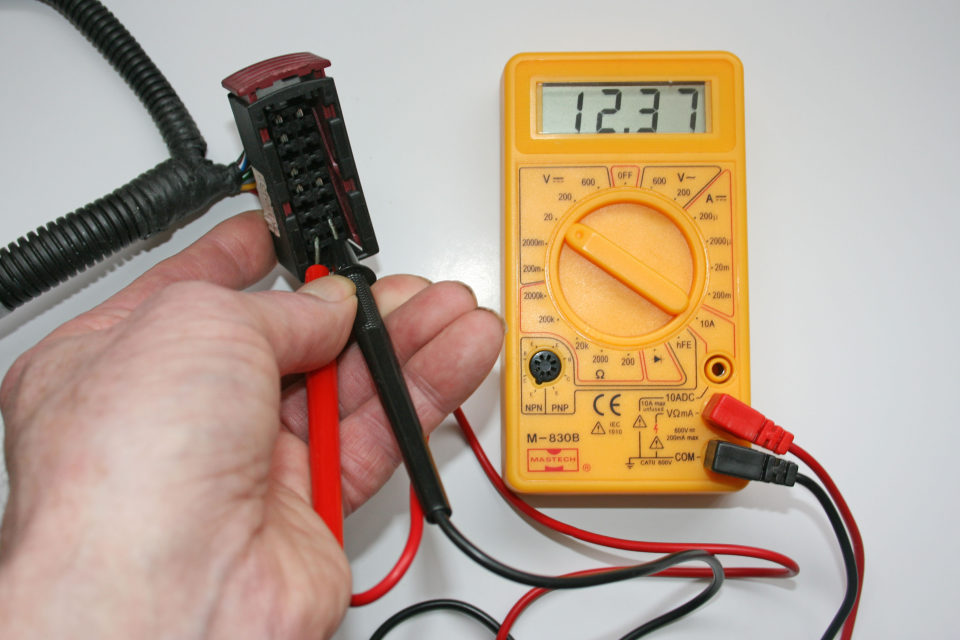
Checking for power on the D2/D4 connector.
For those unfamiliar with multimeters it is set to 20v dc range.
Battery voltage will usually be between 11 and 15 volts.
If the probes positions shown here were swapped it would read -
Note this test should not be used to check for low voltage as the Eberspacher needs to be connected and running during startup for low voltage testing.

Continued on Faults 2 page - Faults while running

Feedback on our Eberspacher advice pages has been very positive, keep it coming.
I would appreciate an email, contact details on Eberspacher introduction page, if you found these articles useful. It helps me to gauge how much interest there is and keeps me motivated.